Family Dinner: From Soup to Nuts

3326

Shopping list for last week’s dinner. ? means look in the cupboard first!

I think the only nut is me but almost every Sunday I cook family dinner to which my parents and brother (and their dogs, Maxwell and Dutch) have a standing invitation. Sometimes to broaden our circle I will invite others but frequently it’s just me, Jack and my mom and dad.  Cocktails are always at 5:00, with dinner following shortly after. The whole affair is wrapped somewhere in between 7:00-8:00, because when you’re getting together weekly, it doesn’t need to last for hours.

I started this “tradition” a year and a half ago when my mom’s back was bothering her and she was feeling housebound. I invited them to dinner on a Sunday at 5:00 and served simple but delicious Chicken and Noodles (a la Maidee Watson). After we were done, I thought, “I should do that again next week” and here we are. It seemed like a great way to utilize (ahem, justify?) all the cookbooks I’ve amassed, do a little cooking therapy and see my parents and brother, which when you work 40+ hour weeks can be tricky to do. Occasionally if Sunday night is busy with other activities, we will do lunch instead (Jack’s got a killer Rueben recipe!).

There are three four components to my menus: Cocktails, the main course (including veg and if needed starch and bread), dessert and the table settings. I don’t do hors d’oeuvres because most of us don’t have the appetite for a snack and then dinner and I usually serve dinner soon enough after the cocktails that I am not concerned. The exception is in the summer when I serve margaritas, I’ll make guacamole, of course!

I’ve learned the hard way to decide on a cocktail on Saturday because if it’s a new recipe and it needs testing, you’ve only (or at least I’ve only) got a few opportunities to get it right before it all goes downhill. Tonight I’m serving Jameson and ginger ale because I don’t think serving my parent’s Irish Car Bombs would be a good idea.  My stand-by and crowd favorite is a Manhattan. A few weeks ago I served a Nacho Vidal from Bon Appetit which was a hit  and the bonus was they could be mixed up in a pitcher versus made individually.

If I don’t have a menu in mind (based on what’s in my cupboards or freezer)  by the time the weekend rolls around, then I start perusing cookbooks Saturday morning.  I try to pick one new or edgier recipe one week followed by a more traditional/favorite the next week.  Last week I made Chicken with Cardamom Rice from “Jerusalem: A Cookbook” by Yotam Ottolenghi and Sami Tamimi (go buy it now!) that I wasn’t sure would float, but everyone enjoyed it (my brother pushed the currants to the side of his plate). I figure if it doesn’t turn out or everyone hates it, we can always order pizza, right? Tonight, there’s a Wagyu Corned Beef bubbling away in the oven  (Cooks Country) which I will also serve with a side of mashed potatoes as well as with the boiled red potatoes, carrots and cabbage.

If the dish warrants a starch I’ll usually default to mashed potatoes because my dad LOVES them.  A few weeks ago I switched it up and made Deb Perlman’s mashed Yukon golds with browned butter and buttermilk that were fantastic served with tomato glazed meatloaf .  Depending on the maindish, I cook a vegetable and usually also make a green salad because I love a simple romaine salad with a lemony mustard vinaigrette and parmesan.  Because my dad is not a green salad fan, I’ll do broccoli, Brussels sprouts, asparagus, beets, etc. but I will frequently serve them with a flavored butter or vinaigrette so they have a little kick.  Most weekends, I make two loaves of bread from the amazing book by Ken Forkish, “Flour, Water, Salt, Yeast” (go buy it now!) or if the meal doesn’t lend itself well to bread, I’ll make popovers which are a favorite and so much easier! Tonight with our corned beef we’re having Irish Soda bread.

Dessert can be as simple as tonight’s  Barefoot Contessa Chocolate Chunk Blondies or as elaborate as the Maida Heatter chocolate cake I made last week.  One week I served all the leftover bits and pieces I’d frozen from previous dinners, not the biggest hit, but it sure was easy!  Soon the rhubarb will be ready and we’ll have four to five weeks of rhubarb desserts.

I set the table every week, trying to make it a step up from the weeknight and not as fancy as the holidays. I own a lot of white serving pieces (bowls, platters, etc.) and my everyday dishes, as well as my china, are also white, which makes it so easy to change the look with a tablecloth or placemats and the food always looks good in white. I rarely serve the main dish from the pot, unless it’s something that would be risky to try to transfer to another dish. Because I am the daughter of Ida, I also own a lot of stemware, so cocktails are always in a fancy glass. I try to find fresh flowers from my yard or the store but I loathe to spend a fortune on them.  Last weeks camellias were courtesy of the vacant house at the end of the street. If I was honest, I would say there are five components to family dinner, because the clean-up is definitely part of the deal.  Jack usually helps me and and all those dishes I did as a kid also helps, because, I don’t want to boast, but I can wash dishes/clean a kitchen in record time.  Monday night is usually spent unloading the dishwasher and putting all the serving pieces away in my sewing/dish storage closet, while hopefully eating leftovers!

The reality is, it is a lot of work to have people for dinner every week but it’s work I love.  It does not need to be as elaborate as I make it but that’s the fun part for me. Now that the kids are grown and gone, I’m not really sure what to do on the weekends, and this fills my time and fulfills the creative side of me (and allows me to justify my cookbook/kitchen tool habit!). And I get to spend time with people I love. Maybe someday more people I love will be around to come for cocktails at 5?

Look at the time, I’d better get going. Invite someone to dinner next week!

3330

Beautiful camellias!

3315

Narrowing down the choices, the chicken won over the short ribs last week.

3344

Last week’s cocktail choice

3360

Another excellent, but involved, Maida Haetter cake

3359

Baked the cake on Saturday and frosted it on Sunday

3366

Had a lot of broccoli in my fridge. Remember to peel and cut up the broccoli stalks, too. They have more flavor than the flowers.

3365

Yummy mustard butter!

3388

Finished Chicken with Cardamom Rice in my huge All Clad pan–paella pan would have worked well too

3390

Easy but delicious popovers

3370

Simple table

Advertisement

Eggs make magic — they also make Cheesy Multigrain Popovers

Eggs make magic. If you’ve whipped egg whites into stiff, glossy peaks, you know this. If you’ve ever put a souffle in the oven, and then pulled it out, puffed and golden and melt-in-your-mouth delicious, you know this. If you’ve ever made a Dutch baby, or a German pancake, you know. And this is why I am obsessed with popovers. With some flour, milk, butter, and most importantly, eggs, a popover recipe gives you a bread to go with dinner (or breakfast or brunch), with minimal planning, impressive results, and so little effort is feels like cheating. Plus, they are so cheerful! But the most addictive part is the way they, well, pop out and over, thanks to the egg action.

dutch baby photo

The addiction factor was a strong player in my weekend cooking. I made popovers twice this weekend to go with soup for dinner (French lentil and a roasted parsnip/cauliflower). My first round was using the recipe from Good to the Grain by Kim Boyce. Have you purchased this cookbook yet? It is inspiring. Also, the recipes yield delicious results. If you’re anything like me, when you get your hands on this book, you’ll pretend to yourself that you are reasonable person and look for recipes that use flours you already have (like rye, so you’ll make the infamous Rye Crumble Bars a couple of times), then you’ll focus on recipes that use a new one you acquire just for that purpose (maybe barley) and then you’ll just give in as your fridge becomes taken over by a whole litany of alternative flours. And this point, you can make the multigrain mix that Kim Boyce calls for in her recipe for multigrain popovers! Luckily, you can use this mix to make her recipe for multigrain waffles (they are good) and a number of other treats that I haven’t tried yet…but it is only a matter of time.

Anyway, those popovers were good. They were especially good ripped open and liberally sprinkled with freshly ground black pepper. However, even as I was enjoying them, my mind couldn’t help wandering to the block of sharp cheddar cheese in the fridge, and imagining the possibility of a merger and acquisition between the two.

IMG_2218

So, Sunday’s dinner brought more popovers. This time, I opted for a less-rich version of the recipe from the Joy of Cooking, only still with the multigrain mix from Good to the Grain, and a sprinkling of cheddar cheese. Darn it. Just thinking about how tasty and easy these are…I might just have to go make more right now! You should, too.

Cheesy Multigrain Popovers

adapted from the Joy of Cooking by Irma S. Rombauer, Marion Rambauer Becker and Ethan Becker,  and Good to the Grain by Kim Boyce and Amy Scattergood.

  • 1/2 cup all-purpose flour
  • 1/2 cup multigrain mix (see below)
  • 1/2 teaspoon salt
  • 2 large eggs, room temperature
  • 1 1/4 cups milk, room temperature
  • 1 tablespoon warm melted unsalted butter
  • 1/2 cup grated sharp cheddar or Gruyere

Preheat oven to 450. Butter a popover or muffin tin. Whisk together the flours. Whisk the eggs, milk, and butter to combine in a separate bowl, then pour over the flour mixture and fold together until just blended. Fill the popover tins 1/2 full, divide cheese among them, and cover with remaining batter. Bake for 15 minutes at 450, then reduce the oven temperature to 350 and bake for 20 more minutes, until well browned and crusty. Leave those guys alone in the oven without opening the oven door for the last 5 minutes of baking. Serve immediately. The recipes I looked at say this should make 8 popovers, but I always got 7.

Multigrain Mix, ala Kim Boyce

Whisk together:

1/2 cup whole-wheat flour

1/2 cup oat flour

1/2 cup barley flour

1/4 cup millet flour

1/4 cup rye flour

A Piece of Cake

text

If you looked through our texts, a good portion would be about recipes/cooking

Usually one says the phrase “piece of cake” when referring to an activity that requires little effort to finish or a job that’s simple. It is true that some parts of each of these recipes were a piece of cake but the easiest part of all of was eating them!

The first, a Kransekake, was a cake Megan and have been wanting to make for Christmas Eve and this year we finally did. Kransekake is a traditional Norwegian Wedding Cake which if you’ve grown up in a family with Scandinavian heritage you are probably familiar with. Kransekake is also served at the holidays because of its tree shape. It can be made with as many rings as you like, our set of molds consisted of 18 graduated rings. The dough consists of almond paste (ground up blanched almonds), egg whites and powdered sugar. The dough is then piped into the molds so they are smooth. After the dough is baked and cooled they are assembled into a tower that is held together with icing and then decorated with flags and candies. Nothing about the recipe itself is difficult but the assembly requires patience and steady hands. The cooked dough is very fragile and has a tendency to crack, however, it is just moist enough that it can be smashed back together and with the icing glue, no one ever knows. It had good flavor and was a fun decoration as well as homage to part of our heritage but since we’d had the Feast of the Seven Fishes for dinner, no one was very hungry for dessert.

IMG_2706[1]

Dark and Stormies were the perfect addition to our afternoon of baking!

IMG_2700[1]

The molds

2967

Starting the pyramid

2969

Dough is not a perfect medium.

2974

Sort of a leaning tower cake

2994

Finished! And all credit goes to Megan who did the bulk of the work. I cheered and provided moral support

After the holidays I decided to make a Galette des rois or King’s Cake for a family dinner which was somewhat close to the Epiphany when this cake is traditionally served. I was inspired by a David Lebovitz post on the topic . Oddly, it was similar to the Kransekake in that it was a light, almond flavored cake. I used pre-made puff pastry making the whole affair quite easy. My puff pastry was quite frozen and I made the mistake of defrosting it in the microwave. Luckily the buttery pastry was forgiving and I was able to salvage it. If you make this, do be sure to spring for the quality puff pasty–the first ingredient should be butter and this will set you back a few pennies–approximately three times as much as the brand the grocery store usually carries–you’ll have to go to a Metropolitan Market/Whole Foods/Tacoma Boys type store to find it.

3036

Ready for the oven

3044

Galette des rois or King’s Cake

While we were in Portland over the holidays, Megan found a Maida Heatter cookie book at Powell’s Bookstore. She made one of the cookie recipes on New Year’s Eve and they were fantastic! I found a copy of Best Dessert Book Ever at King’s Book in the Proctor District and yesterday I made Sonrisa Chocolate Cake which is her interpretation of a cake made at the Sonrisa Bakery in Santa Fe, NM. This recipe requires very few ingredients but is a bit fussy to assemble and bake. That being said, it’s worth the fussiness. It has the texture of cheesecake without that richness that always seems a bit too much and without the distraction of the crust. I went ahead and did the 1/2 inch strips of paper on the top to create the powder sugar design but you could easily skip that part and just sprinkle the top all over, but be sure to sprinkle more than you think as the sugar melts into the cake.

3104

Dried breadcrumbs on the bottom help when removing the cake out of the pan

3105

If you don’t have a double boiler do what I do and use two saucepans. Just do not get water in your chocolate!

3113

Two mixers are handy for this recipe. I used my hand mixer for the egg whites.

3115

Getting the whites to soft peaks

3119

Gently fold the chocolate mixture into the egg whites

3125

Do not get impatient at this point, cake must be cooled completely

3128

Fussy parchment paper strips

3129

Should have been a little more generous with the powdered sugar

Sonrisa Chocolate Cake

8 to 10 portions

Maida Heatter

10 ounces bittersweet or semisweet chocolate (I used bittersweet)

4 ounces unsalted butter

6 large eggs, separated

1 cup granulated sugar

1 tablespoon dark rum

Confectioners sugar (to be sifted on top after the cake is baked)

Preheat oven to 375 degrees and place oven rack one third up from the bottom. Butter an 8-by-3-inch springform pan. Line the bottom of the pan with a round of parchment. Butter the parchment and then dust the entire pan with flour. Sprinkle fine bread crumbs on the bottom of the pan.

The cake is baked in a water bath, so wrap the pan in two layers of aluminum foil–don’t let the foil go over the top of the springform and make sure you wrap it so it is watertight.

Cut the butter and chocolate into small pieces and place in the top of a double boiler over warm water on moderate heat and let cook until partially melted. Then stir until completely melted and smooth. Remove the top and set aside.

In the bowl of an electric mixer, beat the egg yolks with 3/4 cup of the sugar on high speed for several minutes until the mixture forms a wide ribbon when the beaters are raised. On low speed add the chocolate mixture and the rum and beat, scraping the bowl with a spatula until smooth. Set aside.

If you do not have another mixing bowl, or a hand held mixer, wash your mixing bowl and beater and dry well. In a clean small bowl with clean beaters (so important with egg whites), beat the egg whites until they hold a soft shape. On moderate speed gradually add the remaining 1/4 cup of sugar, and then, on high speed, beat until the whites just hold a straight shape when the beaters are raised. Do not beat any more than necessary.

Stir one fourth of the whites into the chocolate mixture. Then, in two additions, fold in the remaining whites only until just barely blended.

Transfer the batter to the prepared pan. Place the pan in another pan that is wider but not deeper. Place in the oven and pour hot water (the water from your double boiler works perfectly) 1 inch deep into the wider pan.

Baker for 15 minutes. Reduce the temp to 350 degrees and bake for 15 minutes more. Reduce the temp to 275 degrees and bake for 30 minutes more. Turn off the oven and prop the door open a few inches and let cake sit for 30 minutes.

Remove the cake from the oven and the water bath. Remove the foil and let cake stand for several hours at room temp until completely cool.

Run a sharp knife around the edge of the springform pan and then remove the sides of the pan. With a table knife or metal spatula quickly smooth the edges of the cake. Then cover the cake with a cake plate (or the plate you will serve it on) and turn the cake (and the plate) over. Carefully remove the bottom of the pan and slowly peel of the parchment paper lining. Leave the cake upside down.

Optional (in my opinion). Make 9 inch by 1/2 inch strips of wax paper. Lay across the top and then sprinkle generously with powdered sugar.

Serve at room temperature with a mound of whipped cream on the side (1 cup whipping cream, 1/2 teaspoon vanilla and 2 tablespoons powdered sugar).

Enjoy!

Crying Cake

IMG_1461

It’s not an actual recipe, and this particular cake was not a crying cake, this was a delicious graham cracker flour, milk chocolate cake with marshmallow frosting (which involved a blow torch) from The Smitten Kitchen Cookbook by Deb Perelman. But as I recipe plan for holiday menus I am reminded to not make a crying cake.

I’ll tell you the story. It was the Christmas of Megan’s senior year of college. She had been dating John Hansen for a couple of years and she was going to spend the Christmas holidays with his family in Portland, OR. I knew this, I had prepared for it and I was ready for it (?). They were planning to drive down early on Christmas Eve but it snowed that morning and the roads were treacherous. They thought about not going and a part of me was happy but then I thought about how much Katy, John’s mom, was looking forward to spending the holiday with them and we had already exchanged gifts and I had prepared myself for this so I encouraged them to go, to take the train down. They purchased last minute tickets, we said our “good byes” and “have a good times” and Jack and Mitch drove them to the train station. I busied myself finishing the Christmas Eve dinner preparations as we had guests arriving in a few hours. I was making a cake from a Giada cookbook, Hazelnut Crunch Cake with Mascarpone and Chocolate. I had baked the cake layers and frozen them, so all that was left was the frosting and then the hazelnut candy on top. That’s right, hazelnut candy. First of all, hazelnuts are a pain in the %^&# to skin. You have to roast them and then rub them in a dish towel, creating a mess everywhere. Then I had to make a sugary concoction which seemed from the instructions to be easy–no candy thermometer, no scary words like “hard crack”, just boiling the sugar for about 8 minutes until it is light brown, pouring it over the nuts, chilling it, breaking it into small pieces while saving some bigger shards to decorate the top. My first attempt was a sticky mess, my second (after skinning more hazelnuts) was no better, which was when Mitch and Jack came home and I was in the kitchen, crying. The tears were not just about my frustration over the candy failure, obviously. I had done what you should never do when you are entertaining. I had gotten myself in too deep–it was too much. Maybe on a normal day, it would have been fine but I had not factored in the emotional quotient. And the holidays are never emotional, right?

So, as you plan your holiday menus, don’t make a crying cake. Know your limits–whether that be time, skill level or your physical and emotional state. If you’ve been living on little sleep trying to get everything done, you might not want to attempt a Bee Sting Cake from Smitten Kitchen (I really, really want to make this). If a recipe looks like it might be a crying cake, take the time and spend the money to try it out in advance. Think about the day, what your end goal is. Mine is good food, a nice party (where I don’t look like I’ve been crying) and time preparing with those I love.

To end the story, Jack make the hard crack hazelnut candy (he has the candy making gene) in one attempt, I pulled myself together, we threw a great party and I learned a valuable lesson, actually I learned several! Now, off to pare down those menus…

Crying Cake

A picture from the cookbook because if you go on line for the recipe it appears people were smarter than me and did not attempt the candy shards!

French Fries and Ketchup

IMG_2534[1]

This is all it takes to make a fantastic fall dinner

Actually it’s Gnocchi in Tomato Broth, but upon further reflection–and after having cooked and eaten this dish four times, I think I know why I like it so much–potatoes and tomato sauces  are delicious together. Tender gnocchi (potatoes and flour) with the most subtle, rich, delicious tomato broth, EVER.  I’ve ordered gnocchi in restaurants but usually with a rich, creamy sauce which is just too much when paired with the richness of the gnocchi.  This tomato broth cuts the richness of the gnocchi making the perfect combination–like french fries and ketchup or dare I say, hash browns and ketchup? but don’t worry, I will never say mashed potatoes and ketchup–that just seems wrong.

Megan and I first made this recipe from the  The Smitten Kitchen cookbook by Deb Perelman last Christmas Eve. I made it one other time last winter and then Megan and I made it again in October when I visited her and John in Cambridge.  We were smart this time, and froze half of the gnocchi but slurped down all the tomato broth so on my last day in town when Megan and John were both working, I made another batch.  It was a relatively warm autumn day so I had the back door open, workman were doing some sort of brick work to their building and when one of them drove by on his little tractor type vehicle, he said “Shuh , smells good in thah”and indeed it did!

The recipe is not difficult but I do not recommend it for a weeknight meal–I’ve tried it–you eat at 10:00 p.m., but it is a perfect recipe to make on a weekend  and if you can bear not consuming it that day, freeze it or freeze half of it.  You start by baking potatoes for the gnocchi and while they are baking you make the tomato broth.  It’s sort of like making chicken stock but with tomatoes.  You saute onions, celery, carrot and garlic and then add white wine, chicken broth and whole tomatoes.  You cook it until it thickens (about 40 minutes) and then strain it, unfortunately, throwing all those ingredients away,  leaving  you  with a beautiful tomato broth.  The gnocchi is a simple mix of riced or grated potato, egg and flour.  For a non-holiday meal, I forgo making it fancy (rolling it over fork tines) and just cut it into 3/4 inch pieces.  The gnocchi are boiled  in salted water until they float and then are drained and added back to the broth (or put on a parchment lined baking sheet to freeze until solid when they can be placed  into a freezer bag)  If you decide to freeze some of the broth, put it in a freezer bag, lay it on a baking sheet, place it in the freezer and you’ll have a nice flat  bag of frozen deliciousness.  Make it, it’s wicked good!

IMG_2539[1]

Onions, carrot, celery, garlic, tomatoes, white wine and chicken broth bubbling away

IMG_2541[1]

2 pounds of baked potatoes riced

IMG_2543[1]

Everyday gnocchi–no fancy fork tine designs

IMG_2546[1]

When they float to the top, they’re done!

IMG_2554[1]

Served with a dollop of ricotta and a chiffonade of basil


These are a few of my favorite things

2491

One of my stashes–I use these the most.

“Raindrops on roses and whiskers on kittens.  Bright copper kettles…”  Now you’re talking my language!  I admit it, I LOVE cooking supplies:  pots, pans, utensils, gadgets, dishes, glassware, cookbooks and on and on and on. I now peruse cooking equipment catalogs liked I used to go through the Sears and JC Penney catalogs as a kid.  And if I didn’t have a mortgage and did have a staff, I’d have more bright copper kettles.  However, while I am lacking in copper, I do own All Clad cookware.  I know, everyone uses All Clad now but I have had mine for a LONG time, before Martha and everyone else made it popular (and too expensive).  It cooks like a dream and I use it almost exclusively, unless I am using my enameled cast iron or one of Jack’s beautifully seasoned black cast iron pieces.

2494

Yikes, someone needs to do some polishing.

Utensils, I have a lot of them–three crocks and one drawer full.  Perhaps too many? but I use most of them.  My favorites are tongs, Microplane graters, sieves, heat tolerant spatulas (and lots of them), citrus squeezers,  good quality whisks, Y vegetable peelers (thanks to Megan for introducing me to this gem while I visited last week) and of course, knives.  My knives are sharp–sharp enough to send you to Urgent Care for stitches, twice.  I’ve never purchased a knife, there would be no point, that’s Jack’s job, and one he takes quite seriously. We also have a rule that I must be notified/warned  when knives have been sharpened.

2463

I keep a salt pig filled with kosher salt next to my stove.  I always cook with kosher salt as it is less salty and easier to incrementally season food with.

2462

And my newest favorite thing that I lived with out until this year and I never thought I wanted, but now I can’t imagine how I lived without it,  is  the automatic ice maker in my new refrigerator.  Ice all the time!  Blanching vegetables no longer means you don’t have ice for cocktails.  I freaking love this thing.

2495

I no longer hang soccer schedules or ortho appointment cards on my fridge but I do keep notes, pictures and mementos that remind me of the kids or of favorite places, notepads and snarky magnets–which make me laugh.

My fridge--notes from the kids, pictures an snarky magnets

My collage

Of course there are many more things I love, like the granite counter top next to my stove, my Bose radio which fills the quiet hours (and the magnetic remote volume control that attaches to my fridge) , my kitchen window which gives me something nice to look at while scrubbing pots…

“When the dog bites, when the bee stings, when I’m feeling sad…”  I head to my kitchen!

Cheers!

Spiced Chickpeas

On pretty much a weekly basis for the past five years, when John and I ask each other what we should have for dinner, “spiced chickpeas with ginger” comes up. It’s also not unusual when Stephanie and Jack and I are planning on dinner together for this recipe to be tossed out as an idea. While it may have been an exotic way for us to fuel our spice purchasing addiction at one point, now it just feels like a homey family recipe.

Penzey's Order

One of the reasons this recipe has elevated itself to staple status is that it can be made from basic ingredients I tend to have on hand anyway: cans of chickpeas, a can of tomatoes, garlic, onion, spices, ginger (ginger can keep for quite awhile if you stash it in a cupboard rather than the fridge), rice, lemons, and cilantro. Oh, and a touch of mayo — it sounds crazy, but it really elevates this to a wonderful level of deliciousness. You can call it aioli in good conscience if it makes you feel better.

This meal also makes wonderful leftovers the next day in your lunch. That is, you should have plenty of leftovers if you don’t always end up eating more of it than you intend to…luckily I stopped myself in time last night!

spiced chickpeas

Spiced Chickpeas with Garlic Mayonnaise and Brown Rice

adapted from Deborah Madison’s recipe in Vegetarian Cooking for Everyone

Ingredients:

  • 1 cup brown rice, rinsed
  • 2 tablespoons olive oil
  • 1 large onion, finely chopped
  • 4 cloves of garlic, minced, divided
  • 2 tablespoons minced ginger
  • 1 15-oz can of whole tomatoes, chopped, juice reserved
  • 1 bay leaf
  • 2 teaspoons cumin
  • 2 teaspoons coriander
  • 1/4 teaspoon cardamom
  • 1/2 teaspoon kosher salt
  • 2 15-oz cans of chickpeas, drained and rinsed

For the garnishes:

  • 1/4 cup of mayonnaise or light mayonnaise
  • 1/2 lemon, zested and juiced
  • 1/2 cup cilantro

Directions:

Start the rice. Use this method: Bring a large pot of water to boil. Rinse the rice and add it to the pot to simmer, uncovered, for 30 minutes, or until tender. Drain. Add it back to the pot and cover it to steam for another 10 minutes. Voila. The easiest brown rice ever.

For the chickpeas: Gather all the unprepped ingredients on the counter. Heat the olive oil in a large skillet over medium-low heat. Add the chopped onion and cook until translucent, 10-12 minutes. You can prep, measure, and chop the rest while the onion cooks if you have everything at hand and work quickly. To a medium bowl, add the ginger (try peeling it with the edge of metal spoon — it works great), the minced garlic (setting aside half for the garlic mayo), the chopped tomatoes (drain the liquid into a measuring cup), the bay leaf, spices, and salt. Once the onions are browned, add the tomato and spice mixture, and cook for about 5 minutes. Add enough water to the tomato liquid to equal 1 1/2 cups. Add this, along with the drained chickpeas to the pan, and simmer until thickened to a sauce-like consistency, about 10 minutes. Taste for salt. Don’t burn your tongue.

Meanwhile, zest and juice the lemon, adding it to the mayo along with the reserved garlic. Set aside.

Chop cilantro.

How is your rice doing? It is probably done at this point. Dish up. Add a spoonful of the mayo…I mean, aioli, and sprinkle on that cilantro. Enjoy!

Roasted Butternut Squash and Farro Salad with Apples and Blue Cheese

Here is a confession that will come as a surprise to nobody: I am a rule follower. Up until very recently, I earnestly followed recipes, measuring each spice and seasoning, setting timers, and not allowing myself to riff too much on what was written.

Bag of Apples

Not that much has changed. I’m still a rule follower… in so many ways. But somewhere in the time lapse of so many meals cooked and enough cookbooks consulted, I have internalized a larger set of rules that are helping me break away from the written recipe scripture.

Now I know I did not discover this equation  — clearly this is a natural law with which people have been engineering for some time. Still, it felt like a revelation when I finally was able to spell it out myself:

grains + leaves + protein + seeds/nuts + vinaigrette = YUM.

The equation gets even yummier if you toss is something roasted, some fruit, and/or something cheesy. This is what I did. I put the “recipe” below, but really, you can do this without it. But all you rebels out there already knew that.

squash and onions pre-roasting squash and onions post-roasting

Roasted Butternut Squash and Farro Salad with Apples and Blue Cheese

Created by Megan Knottingham. Yes, she googled it afterward and was not the first to dream up some of these things in combination…nonetheless, this is her version.

  • 1 large butternut squash, peeled and cubed
  • 1/2 of a large red onion, or 1 whole small red onion, cut into large wedges (these will melt down dramatically, so you want to cut them big)
  • 1 cup of farro
  • baby spinach
  • one large apple, cubed
  • toasted pepitas or sunflower seeds
  • blue cheese, crumbled
  • balsamic vinegar
  • olive oil
  • kosher salt
  • pepper

Preheat the oven to 425°. Toss butternut squash cubes and red onion wedges with 1 to 2 tablespoons of olive oil, two big pinches of kosher salt, and some pepper on a large rimmed baking tray. Roast until the squash gets some crispy brown edges and the onions are melted and caramelized, about 60 -75 minutes. Stirring about every 20 minutes to ensure even browning. Let cool slightly or until room temperature. You can also roast your veggies ahead of time — the first time I made this, I roasted the squash the day before, and heated it up slightly in the microwave before combining it with the other ingredients.

roasted butternut squash and farro salad   roasted butternut squash and farro salad - leftovers

Meanwhile, prepare the farro. Rinse the dry farro. Add it to a medium pot with 3 cups of water. Bring to a boil. Cover and reduce the heat to a simmer. Cook for about 15 minutes, until al dente. Drain, then put into your serving bowl.

Whisk approximately 1 teaspoon honey, 1 teaspoon mustard, 1/3 cup balsamic vinegar, and a pinch of salt together. Whisk in olive oil until it tastes to your liking (I filled my container up to the 2/3 cup mark).

Toss the roasted vegetables with the farro and apples. Add big handfuls of spinach and the vinaigrette. Top with pepitas and blue cheese if you feel like it. Pour a glass of something delicious. Dig in!

This post brought to you by the letter “M”

Cherry Mess

As in Meringue!  I’ve always loved macroons and Megan’s, John Hansen, makes a great, chewy macaroon dipped in dark chocolate. Yum! but my meringue obsession has been broadened this summer by a few new recipes.  The first is a delightful concoction called  Cherry Mess that I found on David Lebovitz’s blog.  If you are not a follower of his blog, you really should be– delicious recipes, funny stories–a great read!  Anyway, I made the cherry mess(es) for a family dinner in July and they were delicious.  They consist of a cherry/red wine almond mixture, crisp almond meringues (or not, if you forget to put in the almond like I did the first time I made them), candied sliced almonds and whipped cream with just a hint of almond (or not, if you forget to put it in the second time you made them, notice a theme here?)  The only thing that could have possibly made them better (besides making them correctly each time) would have been if I could have purchased the adorable wine glasses that Crate and Barrel had on their website–that strangely,or not, in my experience, were not for sale anywhere.  But my mom came to the rescue with her boopie glasses, which looked pretty cute, too.  And my brother said they were indeed cherry messes as he ended up wearing a bit down his shirt.

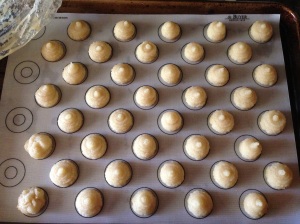
Next new love?  the macaron–which is not macaroon spelled incorrectly, like I thought the first time I saw the word a few years ago.  I’ve tasted some upscale grocery store macarons and have been less than impressed. A few weekends ago I was looking for a couple-of-hours creative project and something to take to dinner at my parents when I remembered a saved Dining section of the New York Times that had a macaron recipe and the not yet used silicon macaron template sheet that Megan  brought me from France.  Perfect!

1532 - Copy

The dough is stupidly simple to make–almond flour, egg whites and sugar.  You don’t even need a mixer.  The panic set in when I read those words I dread, “using a pastry bag fitted with a smooth tip” The pastry bag is where most projects involving a pastry bag seem to go to H-E double hockey sticks for me.  Almost as bad as the other four culinary terms that terrify me, “hard crack” and “soft ball”.  But, I kept a positive attitude (or something close) and figured the dough was so simple, if it all went south, no big deal.  It actually went pretty well and the little silicone template sheet worked fantastic, and they actually baked like the recipe said they would.  I was on a roll.

1533 - Copy

Now to fill them.  Quick google search (the time to leave for dinner was getting closer) for a macaron filling and the first hit was, of course, a Martha Stewart recipe.  Don’t get me wrong, I have followed Martha Stewart since Entertaining was published (and I have a signed copy that was my dear friend, Sally’s) but I have learned sometimes her recipes don’t quite turn out right.  It only required sugar, egg whites and butter which I had all of and it was pretty simple to assemble. It seemed to turn out a little on the thin side to me and when put in the pastry bag (yes, another), it pretty much ran out.  I refrigerated them for one hour and they set up fine so maybe that’s how it was supposed to turn out, but if that’s the case, tell me in the notes or directions!

When all was said and done, they were delicious little morsels.  Great almond flavor with a rich filling and not a crumb was left after dinner.  Next, I might try a floating island with a delicious creme anglaise sauce…

Go have some fun in the kitchen!

1552Nancy Macarons

Adapted from “Cuisiniere Lorraine” by Elisabeth Denis

Time: About 30 minutes

Yield: Approximately 40 2-inch cookies

3/4 cup plus 2 tablespoons sugar

1 1/4 cup almond four or meal

2 egg whites (large eggs)

Heat oven to 350 degrees. Line 2 baking sheets with parchment paper (or silicone template sheet)

In a medium bowl, make a paste using 1/4 cup plus 2 tablespoons sugar and 2 teaspoons water.

Add almond meal and unwhisked egg whites and mix. Add remaining 1/2 cup sugar and mix until thoroughly combined.

Transfer batter to a pastry bag fitted with a smooth tip; pipe out circles about the size of quarters, spacing each disk at least an inch apart. Rap the pans on the counter a few times to even out batter and eliminate air bubbles.

Bake for 15 to 20 minutes or until edges are golden but centers are still light and slightly soft.  Let cookies cool on baking sheets for a few minutes to set.

Green is delicious: Pozole with Pepita-Tomatillo Mole

These past two months have gone by without posting, but not without cooking. Luckily for me though, a lot of it has been done by John! Since he finished the semester back in the middle of May, he has been making a number of tasty creations, including these chickpea sandwiches, green smoothies with almond milk, and a number of pizzas.

There has also been a number of new favorites from some of my favorite cookbooks, including David Lebovitz’s Ready for Dessert, The Smitten Kitchen Cookbook, and The Sprouted Kitchen Cookbook. I highly recommend all of them! I’ve had a lot of fun exploring recipes from these books.

Ingredients for the Mole

My favorite recent meal was the Pozole with Green Mole from Vegetarian Cooking for Everyone (the cooking bible from Deborah Madison). Actually, this is one of my favorite dishes of all time. This is not the first time I’ve made or consumed this dish (Stephanie was the first to make this one), but this time around, I was struck by how quick and easy it actually is, especially when using canned hominy. Is making pozole from scratch, versus using canned hominy, worth it? Yes. But you shouldn’t not make this because you don’t feel like making the dried stuff from scratch. Just use the canned stuff. It is still incredible. When you’re feeling extra ambitious, go ahead and make the pozole from scratch.

And even though there are a number of dirty dishes, this recipe is so fun to make. The green on green on green ingredients are so pretty, the tomatillos are wicked cute, and you’ll feel like you’re making a magic potion when you add romaine leaves to the sauce and then fry it. But it will seem the most magical when you finally taste the finished product.

Pozole with Pumpkin Seed-Tomatillo Mole and Garnishes

Pozole with Tomatillo-Pumpkin Seed Mole
Adapted from Vegetarian Cooking for Everyone, by Deborah Madison

Ingredients:

  • 2 29-oz cans of hominy
  • 1 onion, finely diced
  • 1 garlic clove, chopped
  • ¾ cup of roasted pepitas/hulled pumpkin seeds
  • 1 pound tomatillos, husks removed
  • 10 romaine leaves, cut into strips
  • 2 jalapeños, roughly chopped
  • 1 tablespoon vegetable oil
  • kosher salt
  • garnishes: lime wedges, diced avocado, Mexican oregano, Cholula, corn tortillas (homemade are really good here), quesadilla wedges, a bottle of beer…

Preparation:

Prepare the hominy:

Drain the hominy. Add it to a pot with 5 cups of water, along with the minced onion and garlic, and salt to taste (I’d start with ½ teaspoon of kosher salt). Simmer for approximately 20 minutes (while you are preparing the mole). Add water in ½ cup increments if the pot gets a little dry.

Prepare the mole:

If you are using pepitas/pumpkin seeds that are already roasted, you can go right to pulverizing them in the food processor. If they aren’t toasted yet, toast them in a skillet on the stove top first before grinding. Set aside.

Cook the tomatillos in boiling water for 10-12 minutes, until they are dull colored and soft. Drain. When cooled slightly, add to the blender along with the romaine leaves, jalapeños, cilantro, and a cup of water. Press your favorite blender settings to juice it up. You now how a blender full of delicious green.

Heat a tablespoon of oil in a large skillet. Add the mole, and stir frequently. Cook for about 5 minutes. Add the ground pepitas, and fry for about 12 minutes, until thickened. Then, strain it through a fine mesh sieve. Discard the solids. Taste for salt (the mole might taste quite bitter and spicy at this point – don’t worry. It will be magical when paired with the slightly sweet hominy).

Put it all together:

Taste the simmering hominy for salt. Depending on if you used salted pepitas earlier, your mole may have some salt in it, but probably not enough if the hominy tastes flat. Add the mole to the hominy and stir it all up.

Serve with your favorite garnishes. I like Mexican oregano, avocado, lime, and cilantro — it carries the green theme through, and they just taste right. Some people add sour cream, but I think that actually muddies up the flavor, so I don’t add that anymore. Homemade corn tortillas or corn quesadillas on the side are marvelous. Beer is a great beverage to consume here.