Eggs make magic — they also make Cheesy Multigrain Popovers

Eggs make magic. If you’ve whipped egg whites into stiff, glossy peaks, you know this. If you’ve ever put a souffle in the oven, and then pulled it out, puffed and golden and melt-in-your-mouth delicious, you know this. If you’ve ever made a Dutch baby, or a German pancake, you know. And this is why I am obsessed with popovers. With some flour, milk, butter, and most importantly, eggs, a popover recipe gives you a bread to go with dinner (or breakfast or brunch), with minimal planning, impressive results, and so little effort is feels like cheating. Plus, they are so cheerful! But the most addictive part is the way they, well, pop out and over, thanks to the egg action.

dutch baby photo

The addiction factor was a strong player in my weekend cooking. I made popovers twice this weekend to go with soup for dinner (French lentil and a roasted parsnip/cauliflower). My first round was using the recipe from Good to the Grain by Kim Boyce. Have you purchased this cookbook yet? It is inspiring. Also, the recipes yield delicious results. If you’re anything like me, when you get your hands on this book, you’ll pretend to yourself that you are reasonable person and look for recipes that use flours you already have (like rye, so you’ll make the infamous Rye Crumble Bars a couple of times), then you’ll focus on recipes that use a new one you acquire just for that purpose (maybe barley) and then you’ll just give in as your fridge becomes taken over by a whole litany of alternative flours. And this point, you can make the multigrain mix that Kim Boyce calls for in her recipe for multigrain popovers! Luckily, you can use this mix to make her recipe for multigrain waffles (they are good) and a number of other treats that I haven’t tried yet…but it is only a matter of time.

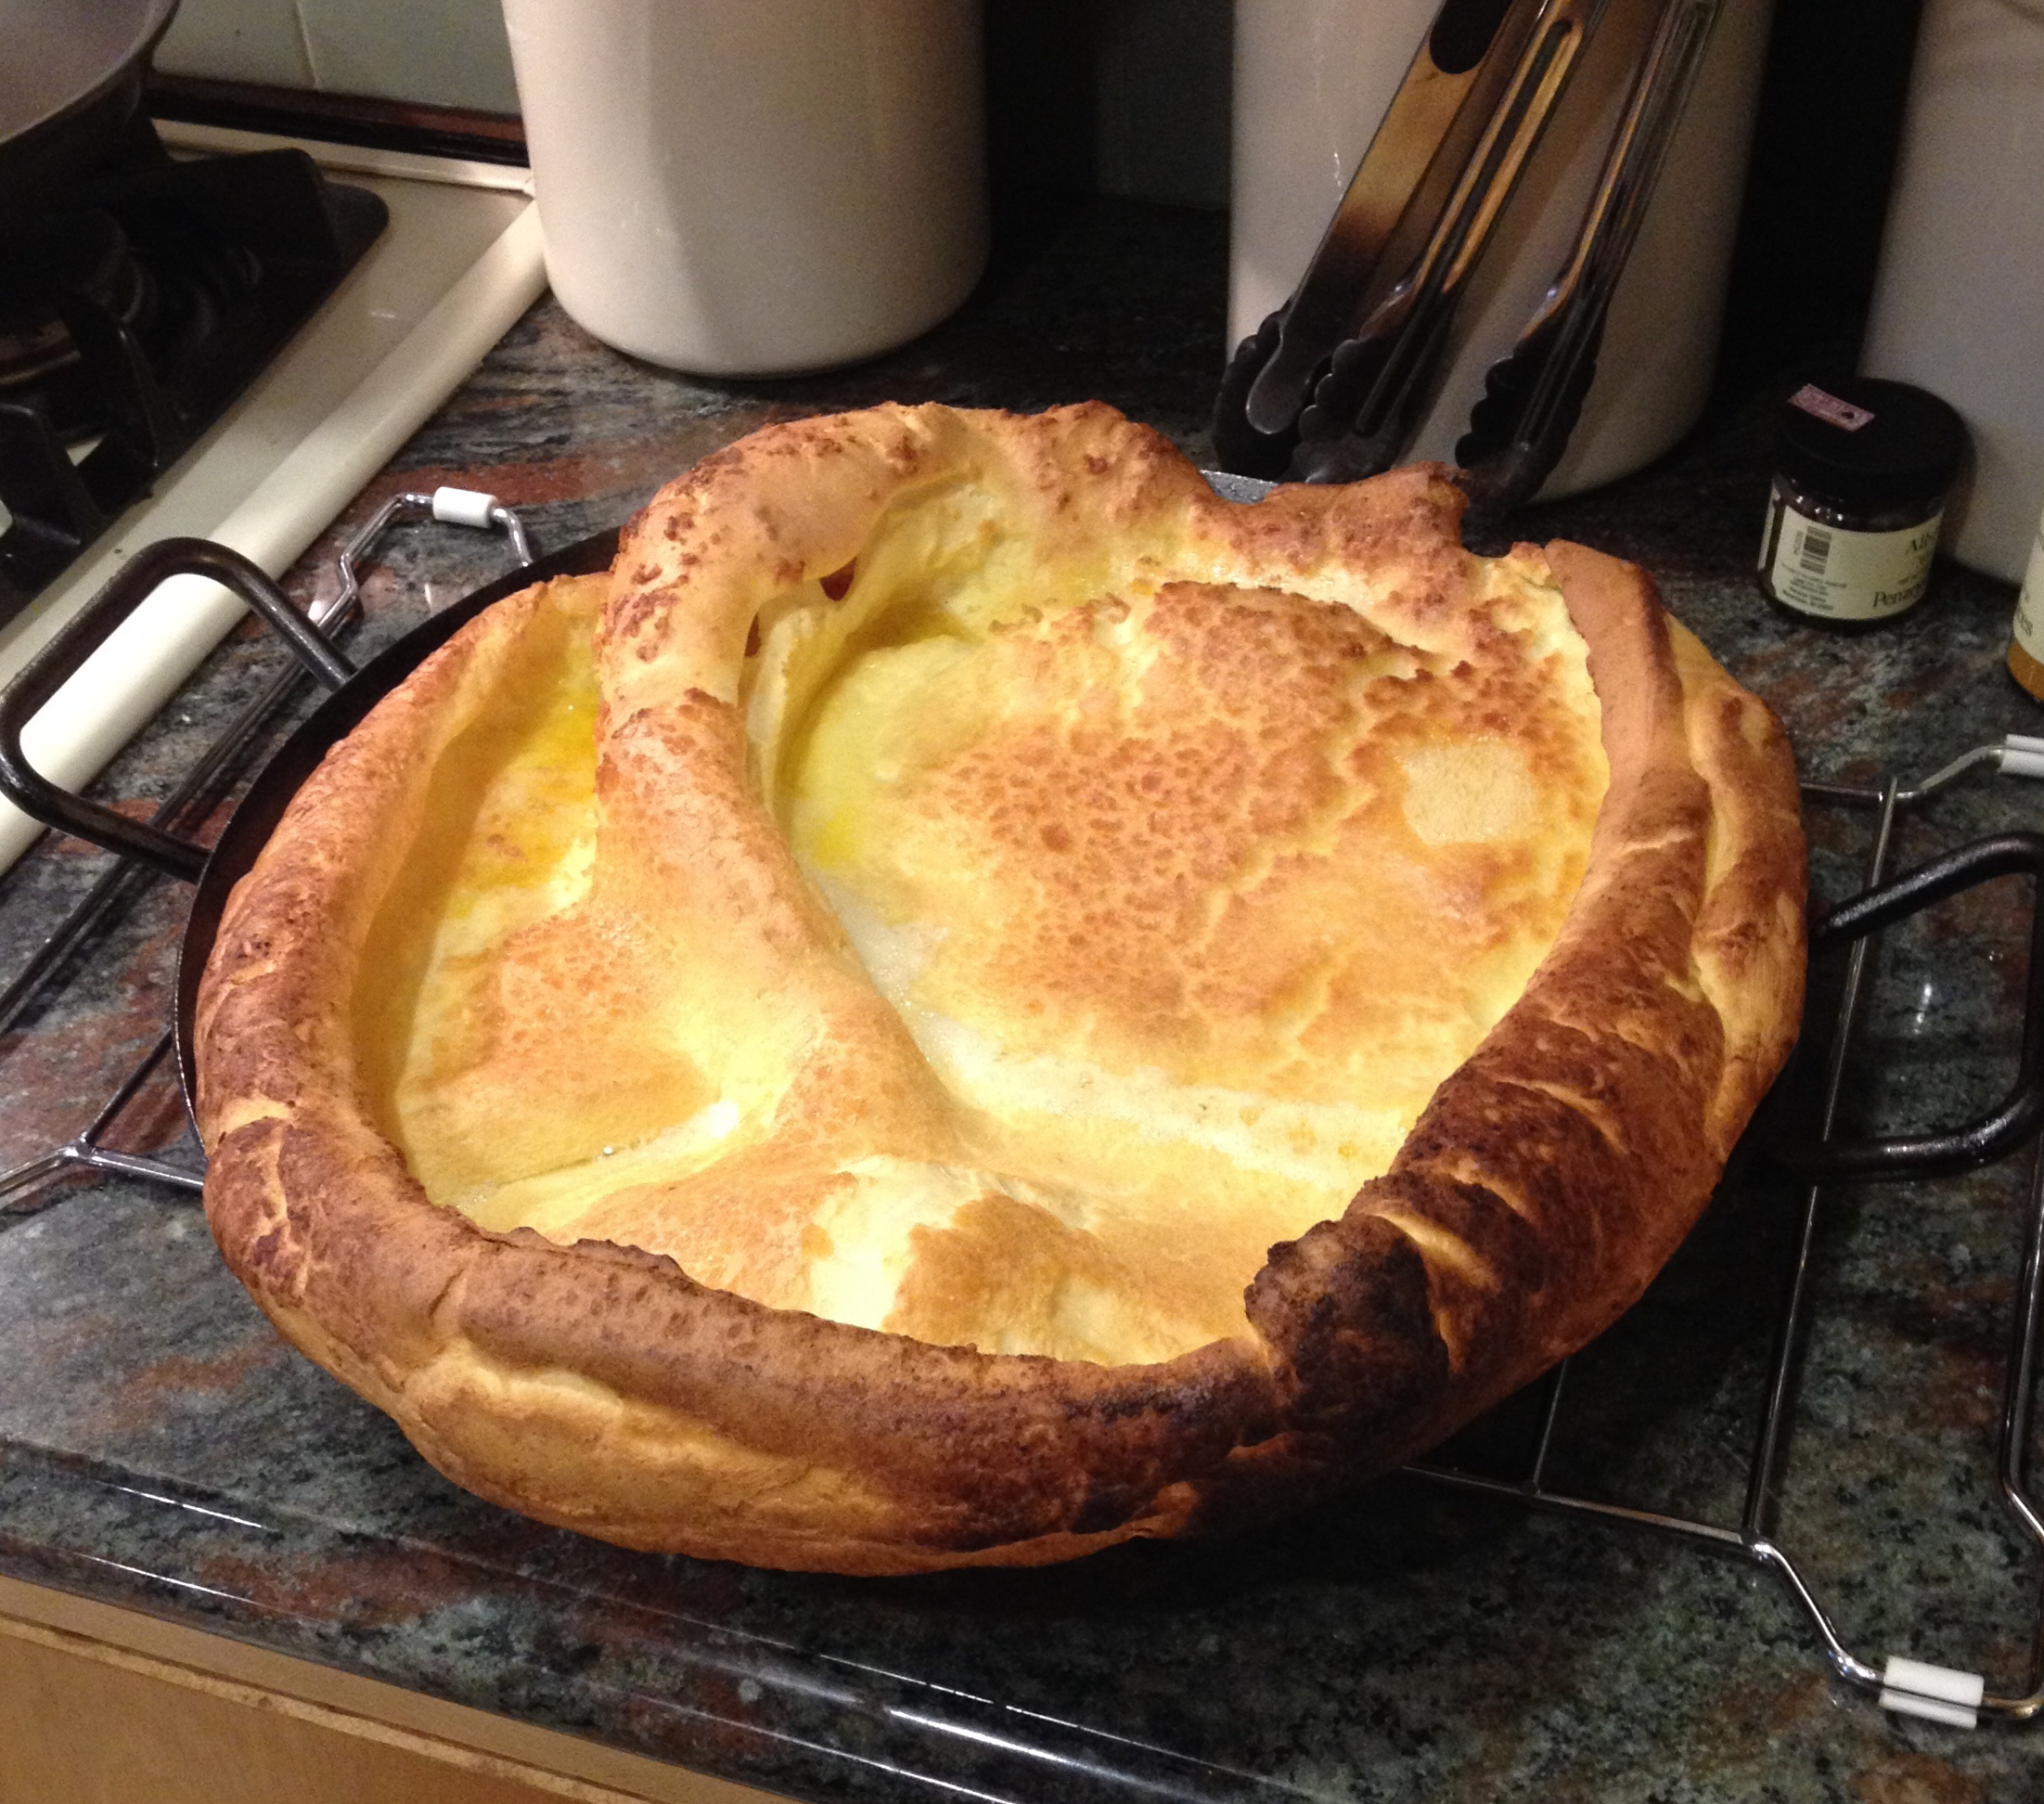
Anyway, those popovers were good. They were especially good ripped open and liberally sprinkled with freshly ground black pepper. However, even as I was enjoying them, my mind couldn’t help wandering to the block of sharp cheddar cheese in the fridge, and imagining the possibility of a merger and acquisition between the two.

IMG_2218

So, Sunday’s dinner brought more popovers. This time, I opted for a less-rich version of the recipe from the Joy of Cooking, only still with the multigrain mix from Good to the Grain, and a sprinkling of cheddar cheese. Darn it. Just thinking about how tasty and easy these are…I might just have to go make more right now! You should, too.

Cheesy Multigrain Popovers

adapted from the Joy of Cooking by Irma S. Rombauer, Marion Rambauer Becker and Ethan Becker,  and Good to the Grain by Kim Boyce and Amy Scattergood.

  • 1/2 cup all-purpose flour
  • 1/2 cup multigrain mix (see below)
  • 1/2 teaspoon salt
  • 2 large eggs, room temperature
  • 1 1/4 cups milk, room temperature
  • 1 tablespoon warm melted unsalted butter
  • 1/2 cup grated sharp cheddar or Gruyere

Preheat oven to 450. Butter a popover or muffin tin. Whisk together the flours. Whisk the eggs, milk, and butter to combine in a separate bowl, then pour over the flour mixture and fold together until just blended. Fill the popover tins 1/2 full, divide cheese among them, and cover with remaining batter. Bake for 15 minutes at 450, then reduce the oven temperature to 350 and bake for 20 more minutes, until well browned and crusty. Leave those guys alone in the oven without opening the oven door for the last 5 minutes of baking. Serve immediately. The recipes I looked at say this should make 8 popovers, but I always got 7.

Multigrain Mix, ala Kim Boyce

Whisk together:

1/2 cup whole-wheat flour

1/2 cup oat flour

1/2 cup barley flour

1/4 cup millet flour

1/4 cup rye flour

Spiced Chickpeas

On pretty much a weekly basis for the past five years, when John and I ask each other what we should have for dinner, “spiced chickpeas with ginger” comes up. It’s also not unusual when Stephanie and Jack and I are planning on dinner together for this recipe to be tossed out as an idea. While it may have been an exotic way for us to fuel our spice purchasing addiction at one point, now it just feels like a homey family recipe.

Penzey's Order

One of the reasons this recipe has elevated itself to staple status is that it can be made from basic ingredients I tend to have on hand anyway: cans of chickpeas, a can of tomatoes, garlic, onion, spices, ginger (ginger can keep for quite awhile if you stash it in a cupboard rather than the fridge), rice, lemons, and cilantro. Oh, and a touch of mayo — it sounds crazy, but it really elevates this to a wonderful level of deliciousness. You can call it aioli in good conscience if it makes you feel better.

This meal also makes wonderful leftovers the next day in your lunch. That is, you should have plenty of leftovers if you don’t always end up eating more of it than you intend to…luckily I stopped myself in time last night!

spiced chickpeas

Spiced Chickpeas with Garlic Mayonnaise and Brown Rice

adapted from Deborah Madison’s recipe in Vegetarian Cooking for Everyone

Ingredients:

  • 1 cup brown rice, rinsed
  • 2 tablespoons olive oil
  • 1 large onion, finely chopped
  • 4 cloves of garlic, minced, divided
  • 2 tablespoons minced ginger
  • 1 15-oz can of whole tomatoes, chopped, juice reserved
  • 1 bay leaf
  • 2 teaspoons cumin
  • 2 teaspoons coriander
  • 1/4 teaspoon cardamom
  • 1/2 teaspoon kosher salt
  • 2 15-oz cans of chickpeas, drained and rinsed

For the garnishes:

  • 1/4 cup of mayonnaise or light mayonnaise
  • 1/2 lemon, zested and juiced
  • 1/2 cup cilantro

Directions:

Start the rice. Use this method: Bring a large pot of water to boil. Rinse the rice and add it to the pot to simmer, uncovered, for 30 minutes, or until tender. Drain. Add it back to the pot and cover it to steam for another 10 minutes. Voila. The easiest brown rice ever.

For the chickpeas: Gather all the unprepped ingredients on the counter. Heat the olive oil in a large skillet over medium-low heat. Add the chopped onion and cook until translucent, 10-12 minutes. You can prep, measure, and chop the rest while the onion cooks if you have everything at hand and work quickly. To a medium bowl, add the ginger (try peeling it with the edge of metal spoon — it works great), the minced garlic (setting aside half for the garlic mayo), the chopped tomatoes (drain the liquid into a measuring cup), the bay leaf, spices, and salt. Once the onions are browned, add the tomato and spice mixture, and cook for about 5 minutes. Add enough water to the tomato liquid to equal 1 1/2 cups. Add this, along with the drained chickpeas to the pan, and simmer until thickened to a sauce-like consistency, about 10 minutes. Taste for salt. Don’t burn your tongue.

Meanwhile, zest and juice the lemon, adding it to the mayo along with the reserved garlic. Set aside.

Chop cilantro.

How is your rice doing? It is probably done at this point. Dish up. Add a spoonful of the mayo…I mean, aioli, and sprinkle on that cilantro. Enjoy!

Roasted Butternut Squash and Farro Salad with Apples and Blue Cheese

Here is a confession that will come as a surprise to nobody: I am a rule follower. Up until very recently, I earnestly followed recipes, measuring each spice and seasoning, setting timers, and not allowing myself to riff too much on what was written.

Bag of Apples

Not that much has changed. I’m still a rule follower… in so many ways. But somewhere in the time lapse of so many meals cooked and enough cookbooks consulted, I have internalized a larger set of rules that are helping me break away from the written recipe scripture.

Now I know I did not discover this equation  — clearly this is a natural law with which people have been engineering for some time. Still, it felt like a revelation when I finally was able to spell it out myself:

grains + leaves + protein + seeds/nuts + vinaigrette = YUM.

The equation gets even yummier if you toss is something roasted, some fruit, and/or something cheesy. This is what I did. I put the “recipe” below, but really, you can do this without it. But all you rebels out there already knew that.

squash and onions pre-roasting squash and onions post-roasting

Roasted Butternut Squash and Farro Salad with Apples and Blue Cheese

Created by Megan Knottingham. Yes, she googled it afterward and was not the first to dream up some of these things in combination…nonetheless, this is her version.

  • 1 large butternut squash, peeled and cubed
  • 1/2 of a large red onion, or 1 whole small red onion, cut into large wedges (these will melt down dramatically, so you want to cut them big)
  • 1 cup of farro
  • baby spinach
  • one large apple, cubed
  • toasted pepitas or sunflower seeds
  • blue cheese, crumbled
  • balsamic vinegar
  • olive oil
  • kosher salt
  • pepper

Preheat the oven to 425°. Toss butternut squash cubes and red onion wedges with 1 to 2 tablespoons of olive oil, two big pinches of kosher salt, and some pepper on a large rimmed baking tray. Roast until the squash gets some crispy brown edges and the onions are melted and caramelized, about 60 -75 minutes. Stirring about every 20 minutes to ensure even browning. Let cool slightly or until room temperature. You can also roast your veggies ahead of time — the first time I made this, I roasted the squash the day before, and heated it up slightly in the microwave before combining it with the other ingredients.

roasted butternut squash and farro salad   roasted butternut squash and farro salad - leftovers

Meanwhile, prepare the farro. Rinse the dry farro. Add it to a medium pot with 3 cups of water. Bring to a boil. Cover and reduce the heat to a simmer. Cook for about 15 minutes, until al dente. Drain, then put into your serving bowl.

Whisk approximately 1 teaspoon honey, 1 teaspoon mustard, 1/3 cup balsamic vinegar, and a pinch of salt together. Whisk in olive oil until it tastes to your liking (I filled my container up to the 2/3 cup mark).

Toss the roasted vegetables with the farro and apples. Add big handfuls of spinach and the vinaigrette. Top with pepitas and blue cheese if you feel like it. Pour a glass of something delicious. Dig in!

Green is delicious: Pozole with Pepita-Tomatillo Mole

These past two months have gone by without posting, but not without cooking. Luckily for me though, a lot of it has been done by John! Since he finished the semester back in the middle of May, he has been making a number of tasty creations, including these chickpea sandwiches, green smoothies with almond milk, and a number of pizzas.

There has also been a number of new favorites from some of my favorite cookbooks, including David Lebovitz’s Ready for Dessert, The Smitten Kitchen Cookbook, and The Sprouted Kitchen Cookbook. I highly recommend all of them! I’ve had a lot of fun exploring recipes from these books.

Ingredients for the Mole

My favorite recent meal was the Pozole with Green Mole from Vegetarian Cooking for Everyone (the cooking bible from Deborah Madison). Actually, this is one of my favorite dishes of all time. This is not the first time I’ve made or consumed this dish (Stephanie was the first to make this one), but this time around, I was struck by how quick and easy it actually is, especially when using canned hominy. Is making pozole from scratch, versus using canned hominy, worth it? Yes. But you shouldn’t not make this because you don’t feel like making the dried stuff from scratch. Just use the canned stuff. It is still incredible. When you’re feeling extra ambitious, go ahead and make the pozole from scratch.

And even though there are a number of dirty dishes, this recipe is so fun to make. The green on green on green ingredients are so pretty, the tomatillos are wicked cute, and you’ll feel like you’re making a magic potion when you add romaine leaves to the sauce and then fry it. But it will seem the most magical when you finally taste the finished product.

Pozole with Pumpkin Seed-Tomatillo Mole and Garnishes

Pozole with Tomatillo-Pumpkin Seed Mole
Adapted from Vegetarian Cooking for Everyone, by Deborah Madison

Ingredients:

  • 2 29-oz cans of hominy
  • 1 onion, finely diced
  • 1 garlic clove, chopped
  • ¾ cup of roasted pepitas/hulled pumpkin seeds
  • 1 pound tomatillos, husks removed
  • 10 romaine leaves, cut into strips
  • 2 jalapeños, roughly chopped
  • 1 tablespoon vegetable oil
  • kosher salt
  • garnishes: lime wedges, diced avocado, Mexican oregano, Cholula, corn tortillas (homemade are really good here), quesadilla wedges, a bottle of beer…

Preparation:

Prepare the hominy:

Drain the hominy. Add it to a pot with 5 cups of water, along with the minced onion and garlic, and salt to taste (I’d start with ½ teaspoon of kosher salt). Simmer for approximately 20 minutes (while you are preparing the mole). Add water in ½ cup increments if the pot gets a little dry.

Prepare the mole:

If you are using pepitas/pumpkin seeds that are already roasted, you can go right to pulverizing them in the food processor. If they aren’t toasted yet, toast them in a skillet on the stove top first before grinding. Set aside.

Cook the tomatillos in boiling water for 10-12 minutes, until they are dull colored and soft. Drain. When cooled slightly, add to the blender along with the romaine leaves, jalapeños, cilantro, and a cup of water. Press your favorite blender settings to juice it up. You now how a blender full of delicious green.

Heat a tablespoon of oil in a large skillet. Add the mole, and stir frequently. Cook for about 5 minutes. Add the ground pepitas, and fry for about 12 minutes, until thickened. Then, strain it through a fine mesh sieve. Discard the solids. Taste for salt (the mole might taste quite bitter and spicy at this point – don’t worry. It will be magical when paired with the slightly sweet hominy).

Put it all together:

Taste the simmering hominy for salt. Depending on if you used salted pepitas earlier, your mole may have some salt in it, but probably not enough if the hominy tastes flat. Add the mole to the hominy and stir it all up.

Serve with your favorite garnishes. I like Mexican oregano, avocado, lime, and cilantro — it carries the green theme through, and they just taste right. Some people add sour cream, but I think that actually muddies up the flavor, so I don’t add that anymore. Homemade corn tortillas or corn quesadillas on the side are marvelous. Beer is a great beverage to consume here.

The Modern Martini (cilantro-lime gin cocktail)

In the name of science and the public good, I’ve infused another bottle of spirits. I know some might be nervous about potentially wasting a perfectly good bottle of booze by stuffing it full of a bunch of nonsense. And as of the date this is published, there are no comments nor reviews on the recipe at bonappetit.com. Someone had to step up to see if it was any good.

the modern martini (gin + cilantro + lime)

cilantro + lime gin

making the modern martini

This is very good. Yes, I am big fan of cilantro, but I am not a big fan of gin. I’ve had a number of several gin and tonics at Stephanie and Jack’s (first with Bombay Sapphire, later with Gordon’s, which I preferred), always with high expectations, but I’ve always been slightly put off by the flavor. When I first sampled this concoction after one day of infusing, I was disappointed because that distinct gin flavor was still there. It also tasted strongly of cilantro. However, when I tried it again the next day, something magical had happened. It tasted herbaceous and smooth. The flavors had melded. And while it tasted a bit green, if I hadn’t known that it was infused with cilantro, I don’t think I could have put my finger on it.

This really couldn’t be easier to make. If a fresh-tasting, simple (and strong) cocktail is what you’re after, you should definitely make this. I also appreciate that all of the effort happens upfront with this cocktail. When you are ready to drink it, you just need to shake it up with some ice and garnish it with a twist.

The Modern Martini

from bon appétit, June 2013

  • 2 tablespoons sugar
  • 1 750-ml bottle London dry gin
  • 3 cups fresh cilantro leaves with tender stems
  • 1/4 cup fresh lime juice
  • 8 lime twists or rounds (to garnish the finished cocktail)

To make the gin, combine sugar and 2 tablespoons hot water in a large jar, cover, and shake until sugar is dissolved. Add gin, cilantro, and lime juice (save gin bottle for finished product). Cover and chill 2 days. Strain into a medium bowl; discard cilantro. Pour cilantro-lime gin back into reserved bottle.

For each cocktail, pour 3 ounces cilantro-lime gin into a cocktail shaker filled with ice. Cover; shake until cocktail shaker is frosty, about 30 seconds. Strain into a chilled Martini glass and garnish with lime twists.

Cilantro-Lime Gin can be made 1 month ahead. Keep chilled.

Cheers!

Megan

P.S. We enjoyed these cocktails with the delightful company of Martha, who was in town at the time. Her visit was the perfect opportunity to finally make a rhubarb recipe I’ve been itching to make for a while now: rustic corn tarts with rhubarb compote! It is now listed under the appropriate category with notes in Rhubarb Roundup Part 1, but I’ll just stick the pics here:

rustic rhubarb tarts

 rustic rhubarb tart with ice cream

Coconut Maple Granola

Although I’ve always loved granola (who doesn’t?), I never got into the habit of eating it consistently for a few reasons. First of all, it’s not that nutritious. While it contains some wholesome ingredients, granola contains plenty of fat and sugar (especially in the grocery store brands made by the big food companies). Second of all, the brands that are the more nutritious, least processed options are crazy expensive. I will not pay upwards of $7 for 8 ounces of granola.

Granola and Yogurt

Granola Ingredients

I had heard that making your own granola was ridiculously easy, but held off for several years not wanting to go down that tasty, addictive road. But alas, the granola recipe in The Smitten Kitchen Cookbook finally looked too good to resist. This is now a regular in my life. No, it is not a health food. But it could be a lot worse! And luckily, a little goes a long way…although a lot goes a long way, too.

Coconut Maple Granola

slightly adapted from the Big Cluster Maple Granola in The Smitten Kitchen Cookbook, by Deb Perelman

The main thing I’ve changed from the original recipe is that I’ve swapped coconut oil for olive oil. I melt the oil in the microwave before adding it. I’ve made it with olive oil, and it’s fine, but the flavor is sweeter and the granola more fragrant with the coconut oil. I also love the flavor of maple syrup, so to emphasize that, I use 2/3 of a cup of the darker grade B syrup. Recently I also added some cardamom along with the cinnamon, and while I couldn’t pick out the flavor per se, I did think that batch was extra delicious.

Although dried cherries are kind of expensive, they are really good in this. I used raisins one time when I was out of cherries, but they were too one-dimensional and sweet to add much to the granola. If you don’t want to spend the money on unsweetened dried cherries, just omit them and add berries to your yogurt and granola. Also, the original recipe calls for toasted wheat germ. My bag doesn’t say that it is toasted, and it definitely gets toasted in the oven, so I think whatever you have will be fine!

The other thing I’d add is that to get the big cluster effect don’t spread out the granola too much on your baking sheet. It needs to be touching in a thin layer. Sometimes it ends up in clusters, sometimes not. In the end, I don’t really care if the granola is in big clusters or not — sprinkled over yogurt, I don’t notice a difference.

3 cups old-fashioned rolled oats

1 cup unsweetened shredded or flaked coconut

1 cup walnuts, coarsely chopped

1/4 cup wheat germ

2 tablespoons coconut oil

1/2 teaspoon coarse salt

1/2 cup to 2/3 cup maple syrup

1/4 teaspoon cinnamon

scant 1/4 teaspoon cardamom (optional)

1 large egg white

1 1/2 cups dried cherries or another dried fruit, diced if large pieces (optional)

Preheat your oven to 300 degrees. Combine all ingredients but the egg white and dried fruit in a large bowl, tossing to coat evenly. Whisk the egg white in a small bowl until frothy. Stir into the granola mixture, distributing it throughout. Spread it in a single layer on a parchment-lined sheet (don’t use foil — it will stick!). Bake for 45 – 55 minutes. About halfway through the baking time, use a large spatula to turn over sections of the granola carefully, breaking them up as little as possible. Rotate the pan if granola is baking unevenly. When it is evenly browned and feels dry t the touch, transfer the pan from the oven to a cooling rack. Cool completely. Once it’s completely cool, break up granola into whatever size clusters delight you. Sprinkle in dried fruit.

yield: about 7 cups

Beet Vodka

People have strong opinions when it comes to beets. Some people love them. Some people only love them when accompanied by chèvre. Some people can’t stand them at all. I’m in the first camp. I love them roasted and tossed in a vinaigrette, smothered in a cream sauce, pickled, stewed in borscht — even shredded and from a can! But most of all, I love them infused in a bottle of vodka.

sliced beets

I had a delicious beet vodka cocktail at Marrow in Tacoma a while back. It was beety in the best way — ruby red, earthy, and sweet. So I was thrilled when I saw the recipe in Bon Appétit’s March issue for beet-infused vodka and the beetnik martini.

My trip to California to catch up with Mitch and Stephanie proved the perfect opportunity to buy some booze at a great price. Because my suitcase was pretty packed by the time we made it to Costco, I opted for the smallest bottle I could find, which happened to be Crater Lake vodka. Does this recipe really need artisanal quality vodka? Probably not. But I wasn’t complaining.

I was a little nervous about dedicating this much vodka for this recipe. What if it ended up just tasting like dirt? The recipe said to let it marinate for 5 to 7 days in the fridge. How would I know when it tasted like it should?

Well…such a procedure necessitates a taste-test! I tried a spoonful from my jug-o-booze at day 5. It had a lovely beet fragrance (I’m not the only one who thinks this is possible, right?), but kind of a thin taste. So I went all the way to day 7. It comforted me all week just knowing that I had a huge jar of vodka in the fridge filling up with beety goodness. By day 7, it tasted delicious!

Beetnik Martini

beetnik martinis

The original recipe called for 1 tablespoon of the ginger simple syrup per 1/4 cup of vodka, but I found there was a better bite when I used a scant tablespoon, or 1 1/2 tablespoons for two cocktails. I like my booze to taste boozy, you know? This is 1/4 cup of vodka we’re talking about. With more syrup, the boozy bite was lost. Also, although I read the recipe a dozen times, typing it up right now is the first time I noticed that it includes lime juice. I never once added it. I imagine it would be stellar. If you include it, you’ll probably want the full amount of ginger syrup. I guess it’s time for me to make round 2!

By the way, the prep picture up top is Jack’s, and the lovely coupe glass photo is his as well. And yes, two generations of Knottinghams made and approve of this recipe. Also, notes for this recipe say it keeps for a month. But as they say on Arrested Development, “It’s vodka. It goes bad once it’s opened.”

Beetnik Martini 

adapted from Bon Appetit, March 2013

Ingredients

Vodka and syrup

  • 6 medium red beets (about 2 1/2 pounds), scrubbed, trimmed
  • 1 750-ml bottle vodka
  • 3/4 cup sugar
  • 2 tablespoons grated peeled ginger

Assembly

  • 3 ounces fresh lemon juice
  • 3 ounces fresh lime juice
  • 12 lemon slices

Preparation

Vodka and syrup

Cook beets in a large saucepan of boiling water until tender, 1-1 1/4 hours. Drain; let cool slightly. Peel and slice. Combine warm beets and vodka in a large 1 1/2-quart jar (save vodka bottle to store finished product). Cover; chill for at least 5 days and up to 1 week. Strain into a medium bowl; discard beets. Pour beet vodka back into reserved bottle. Cover and chill.

Bring sugar, ginger, and 3/4 cup water to a boil in a small saucepan, stirring to dissolve sugar. Let cool. Strain ginger syrup into a medium jar; discard ginger. Cover and chill. DO AHEAD: Beet vodka and ginger syrup can be made 1 month ahead. Keep chilled separately.

Assembly

For each cocktail, combine 1/4 cup beet vodka, scant 1 tablespoon ginger syrup, and 1/2 tablespoon lemon juice in a cocktail shaker filled with ice (the original recipe calls for an equal amount of lime juice — I somehow missed this each time I made it! Include if you like. It’s still good without it. If you use it, you’ll want a full tablespoon of syrup). Shake vigorously until cocktail shaker is very cold. Strain drink into a coupe or Martini glass or whatever you have. Float a lemon slice on top (and add a giant ice cube if it makes you happy).

Rhubarb Roundup (part 1)

cherry blossoms

Spring has finally arrived here in the Boston area! It was a cold and snowy winter, but the sunshine, warmth, blossoms, and leaves have finally arrived. So has the rhubarb.

Here in Cambridge, I’ve had my eyes open for rhubarb at the various grocery stores, but have been disappointed by either its absence or its pallor. I’ve also been disappointed by the fact that I have to buy it at all, since last spring I could just have my mom cut me a pound…or ten (check out the photo below). Such is the price of city living.

rhubarb plant

However, I was able to find some lovely, vibrantly-hued rhubarb at Market Basket this past weekend. My next task was to figure out what to make. This was a challenge not for a lack of recipes, but precisely because there are so many good ones out there! I spent an hour (or so…) googling through recipes. Instead of replicating this search each spring season, I thought I’d take the time to organize and post them here.

These recipes fall into two basic categories — “made by one of us,” or “not yet made by one of us, but maybe next weekend.”

Made by one of us:

rhubarb upside down cake – made this several times, it is a great way to show off really red stalks.

lemon buttermilk rhubarb bundt cake – made this several times, it has a pleasantly tart flavor from the lemon, and I like it more with just powdered sugar instead of with a glaze. This is what I ended up making, by the way! It is an easy one to bring into work.

rhubarb pie with orange zest — this is my favorite pie ever.

rhubarb syrup with rosewater – it turns out I’m not the biggest rosewater fan. If you like it, you should make this, or just use a tiny amount.

rhubarb crisp a la mode with strawberry sauce  Stephanie said, “Very tasty–first rhubarb recipe I tried that I liked and wanted to make it again. Has white pepper in it which adds a nice twist.”

vanilla-roasted rhubarb and strawberries – Stephanie made this and said it was delicious, but I didn’t get to try it — this will probably be my next attempt!

rhubarb and raspberry crostata – Steph made this, I did get to try it, and will thusly vouch for its deliciousness.

rustic rhubarb tarts with corn flour – Deb Perelman’s tweaks to Kim Boyce’s recipe from (the amazing) Good to the Grain. The tender dough breaks apart very easily — make sure to have plenty of all-purpose flour on the counter and your hands. Now that I’ve tried the compote with a vanilla bean, I’d like to try the original version with hibiscus.

Not yet:

rhubarb shortcakes 

rhubarb snacking cake

rhubarb hamantaschen from Deb Perelman’s own amazing book, The Smitten Kitchen Cookbook (this isn’t the link to her blog here, though — and again, I haven’t tried this, but thought I’d link with that caveat and the plug that if you buy Deb’s cookbook, you won’t regret it!).

rhubarb salad with goat cheese

simple baked rhubarb 

lemon buttermilk rhubarb bundt cake

And yes, this is just part 1. Stephanie and I had so many rhubarb recipes to share, they couldn’t all be rounded up in one attempt.  Here’s to many more iterations of sweet (and savory) rhubarb creations! -Megan